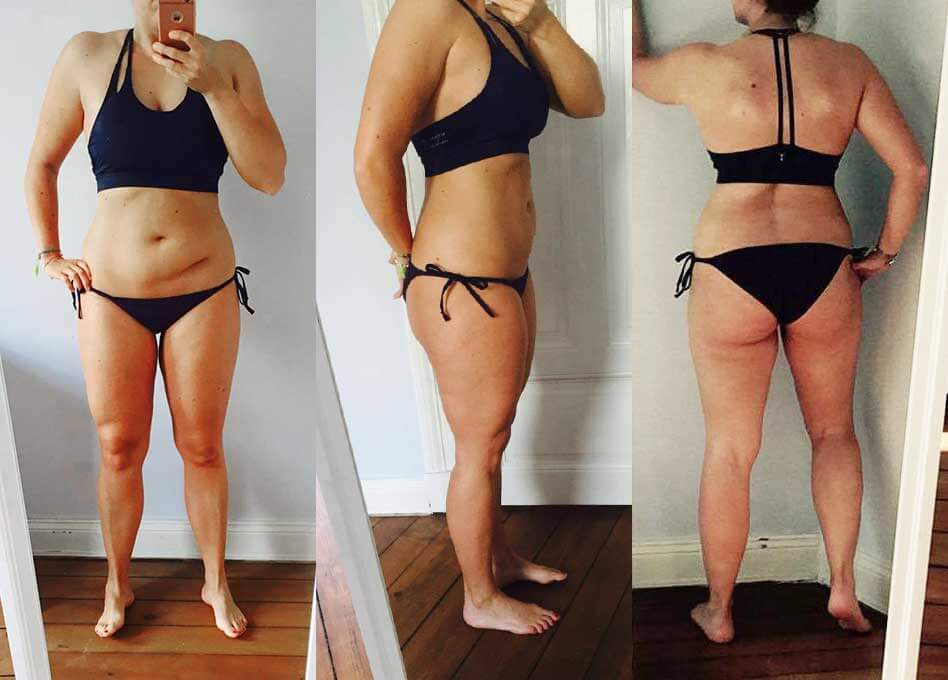
Your before and after analysis

Do you want to get the most out of your nutrition plan? Then make use of the free before and after analysis from the Upfit experts to analyse your progress and get more valuable tips on how you can keep improving. You are not obliged to use this free service, but you are missing out on a great opportunity to get a final summary of your hard work along with valuable tips from professionals. As a thank you for your pictures, you will receive the Upfit Sugar Guide(worth €29.95). It’s this simple:
- Take your before images, and take note of your weight and measurements
- Begin your nutrition plan
- Take your after pictures, write down your measurements and weight after the plan and send these to info@upfit.io.
- Receive your free before and after analysis with valuable tips and the Upfit Sugar Guide.
In order for our nutrition experts to analyse your transformation as best as possible, it is important that the pictures are taken in a certain way. All you need for this is a camera. Follow the following guide to make sure we can analyse your data appropriately.
1. What should your pictures look like?

We’d like to analyse your transformation as best as possible, so it’s important to create as much consistency between the before and after images as possible. This is the best way to document and analyse progress.
- If possible, take the photos against a blank background. In particular, ensure that the lighting conditions are good. Dark shadows or very bright light can distort the image. You should aim for identical lighting conditions for the before and after pictures.
- You should photograph your whole body (at least from shoulders to feet). You have 3 options:
- someone takes a picture of you
- you use the self-timer
- you take hand-held photos in front of a mirror
- Also make sure that the distance from the camera is the same for all shots.
- It is important to adopt the same posture in all the pictures. This means standing upright and straight and letting your arms hang loosely at your sides. You should neither be tensing nor totally relaxed.
- For a complete analysis, your body must be photographed from all sides. We therefore need pictures from 3 different positions:
- From the front
- From the side
- From the back
Send the images to info@upfit.io
2. Body measurements

In addition to your photos, you should send us your body measurements. This means that in addition to your age, height and weight, we also need your body circumferences. We will show you how to measure your body circumference correctly. All you need is a measuring tape. In order to measure your body circumference correctly, it is important to know where to put the measuring tape so that your values can be analysed correctly.
- Chest measurement: this is measured at the widest point. For men, this is usually under the armpits and for women, in line with the nipples.
- Waist: this is measured twice. Once at the widest point (usually in line with the navel) and once at the narrowest point (usually a few cm above the navel).
- Hip: this is measured at the widest point, this is usually just above the crotch line.
- Legs: both the thigh and calf should be measured at their widest point.
- Arms (upper arms): you should also measure at the widest part, which is usually the biceps.
3. Summary
For a complete before and after analysis we need:
- Before pictures from 3 angles (front, side, back)
- Your body data before the transformation (age, height, weight, body measurements)
- After pictures from 3 angles (front, side, back)
- Your body data after the transformation (age, height, weight, body measurements)
Do you have any questions about transformation analysis? Don’t hesitate to send us an email or contact our experts in the live chat. Note: The transformation analysis is free of charge and a core part of your plan. We reserve the right to use particularly remarkable transformations for motivational purposes on our website to motivate people who are working on themselves just like you.
Send your pictures now to info@upfit.io!
