The Upfit App - All functions and features at a glance

Say hello to your even more handy nutrition coach that you can carry around in your pocket. To make it easier for you to get started with the new app, we have summarised all the functions and features for you.
Download the app now:
Minimum requirements: iOS 15.6 or newer; Android 7.0 or newer.
The Plan
The first of the 4 buttons in your bottom control panel is your meal plan. Here you will find all your meals listed by day. We will now show you what you can do with your plan:
Daily overview of calories
Let’s start at the top. Here you can see your daily calorie overview. There you can see how many calories you should eat that day, how many you have already eaten and how many are left. This display automatically adapts to your selection of dishes and updates if you have marked a dish as “eaten” or skipped it.
Change meals
If you don’t like a meal, you can simply swipe to the left and you will receive two more suggestions that also match your needs in terms of nutrients and calories. If you have decided on an alternative, you do not have to confirm it separately, it will be selected automatically.

Favourite meals
If you particularly like a meal, you can use the little heart in the right corner to add it to your favourites. This way you can access the recipe again in the future and integrate it into your plan.
Skip meals
Of course, there are times when you can’t stick to your plan. For example, if you are invited to dinner or for some reason you simply aren’t hungry. If this is the case, you can skip your meal by swiping to the left, past the alternative meals. If you do this, the box will go grey in the overview and will show you that this meal has been skipped and therefore deactivated. You can state the reason and have an overview of how many calories are now available to you. You can undo this with the “Reactivate” button in the same box.
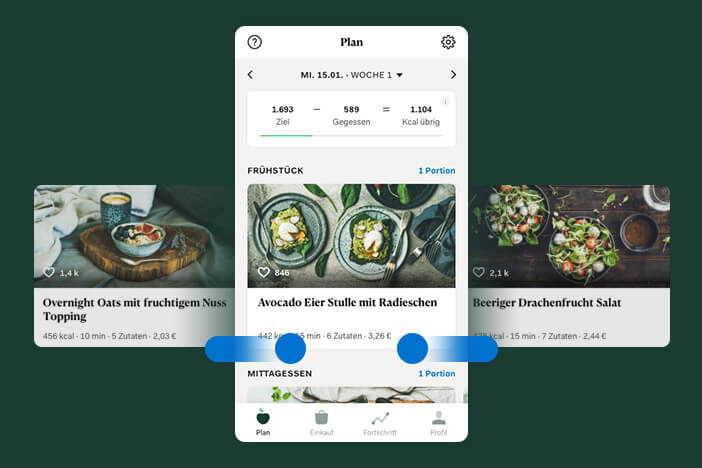
Select a meal from other alternatives and favourites
You will also find the two options “More alternatives” and “Select from favourites” next to the ‘Skip meal’ option. As the name suggests, under “More alternatives” you will find even more meals that you can choose from and which suit your nutritional needs. You can also use the search function to search for special meals/recipes/ingredients or filter using one of the predefined categories. You can select a dish with a simple click.
If you would like to select one of your favourite meals, you can use “Select from favourites” to view all your favourites and integrate them into your plan. There is also a search function and categories that you can use to filter the meals. Please note: not all meals are displayed, since not all meals always match your required calorie requirement.
Adjust portions
Do you have a family or a partner to cook for or have you invited your friends to dinner? No problem at all: With the “portions” function, you can easily cook for several people. There you can also decide whether you want to cook for others or pre-cook for yourself. Pre-cooking means that you cook double or triple the amount, eat one portion straight away as planned and then take the remaining portions to work the next day, for example. If you select the pre-cook function, the pre-cooked dish is automatically scheduled for the next day at noon. You can pre-cook it for up to two days. Important: not all dishes can be pre-cooked as they contain perishable food (e.g. cream, dressings, etc.).
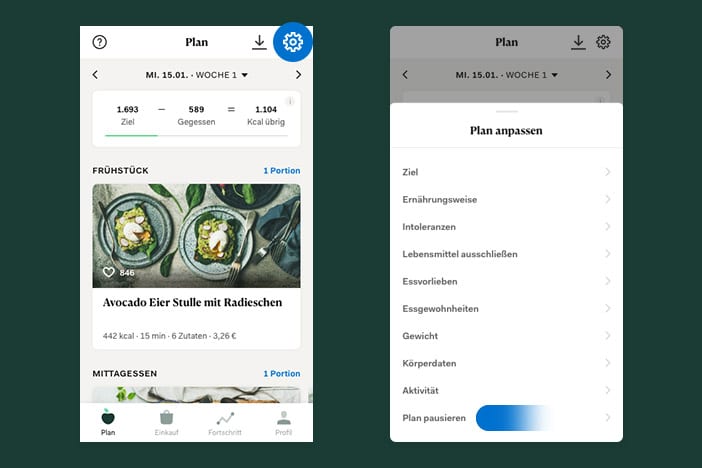
Customise plan
If you would like to change any of your settings or information that you provided at the beginning of the plan, you can do so at any time using the “Customise plan” function. Simply click on the small wheel at the top right. There you can manage, change and adjust your settings. You can find detailed information about the “Customise Plan” function here.

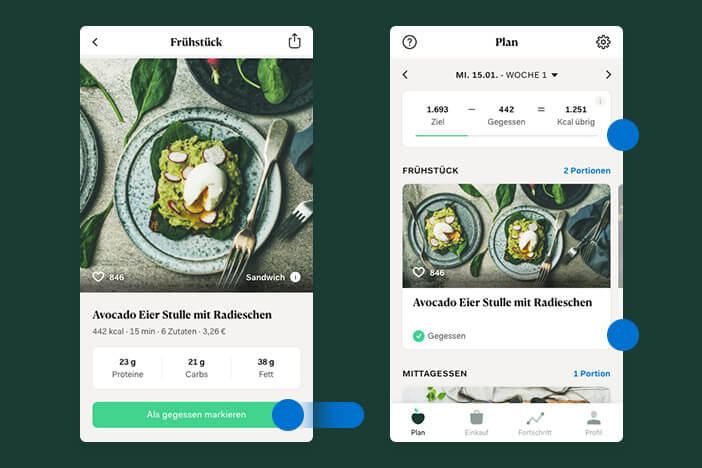
Meal detail view and method
As soon as you click on a meal in the day view, you will get its detailed view. Essentially, what you see here is a larger picture of the associated meal category (e.g. sandwich), the macronutrient breakdown of the meal and, by swiping left, a set of keywords that describe why the meal is right for you. Followed by the ingredient list and step-by-step method instructions. For convenience, the preparation instructions also include the required food quantities, so you don’t have to keep scrolling up and down while cooking. You can also mark the meal as eaten here.
Mark meal as eaten
As soon as you have eaten a meal, you should mark it as eaten so that it is included in the calorie overview. All you have to do is click on the recipe and then click on the “Mark as eaten” button at the bottom – that’s it! The calories consumed are then automatically included in the calorie overview, so that you always have an overview of how many calories you have already consumed and how many are still available.
Track your hydration levels
At the bottom of the page you will find the “Hydration” button. Since adequate water supply is incredibly important for a healthy diet, you can document how much water you drank during the day here. A glass corresponds to 0.25 l. You can tick these off by tapping on a glass or by using the plus (+) and minus (-) signs below it. Next to it you will find your recommended daily water requirement.
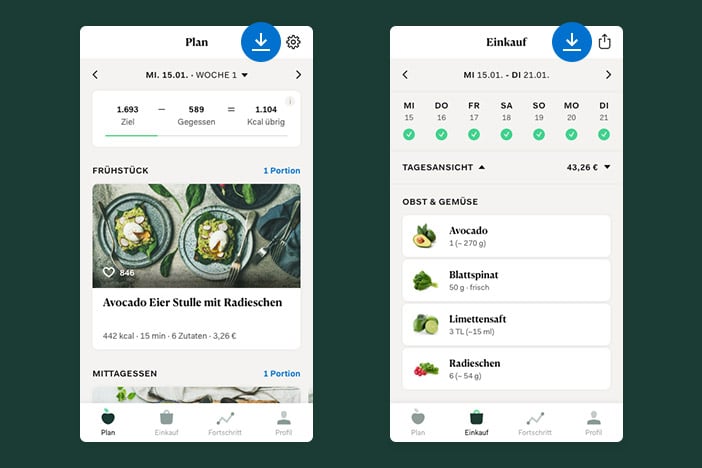
Download / PDF-Function
If you would like to print out your plan, send it or simply save it, you can do so using the download / PDF function. All you have to do is click on the download button in the top right corner and your current week or shopping list will be created and displayed as a PDF. Now you can save it, share it with someone (via a link or as a file) or use it offline.
Freeze function
If you’re on vacation, sick or can’t follow your plan for any other reason, that’s no problem: with the freeze function, you can freeze your plan for up to 60 days without losing any days. You can just pick up where you left off. You can find this feature by clicking the “Customise Plan” button in the top right corner then “Freeze Plan”:
Cooking mode
If you want to have the instructions to the side of you while cooking, it can be very annoying when the screen automatically locks or dims at some point. Our solution: thanks to the cooking mode function, you can use a small switch in the recipe detail view to switch the automatic screen dimming on or off.
You can find more detailed information about this function here.
Report a recipe error
We’re not infallible either, and with such a large database and exchange logic, small errors can creep into our recipes (even if it’s just a typo). In order to be able to recognize and fix these even faster, we have developed the “Report recipe error” function for you. This is how you can support us in making Upfit error-free. Because who knows our recipes better than you?
How does this work? If you have discovered an error in a recipe, you can report it to us at the bottom of the recipe view using the “Report recipe error” button. If you have questions about the exact process, you can check out our support article here.
Thank you once again for your support!
The Shopping List
The second button in the control panel at the bottom is the shopping list, even this has features that will make it easier to use the plan:
Tick off groceries
Basically, your shopping list works in such a way that you can find all the groceries you need in the required quantity and by food category. Sometimes you may still have leftovers at home and don’t need to buy any more. So they don’t really belong on your shopping list. With a simple click on the corresponding food you can tick it off. It will grey out and move to the bottom of the list. You can also easily reactivate it there with just one click. So you only have the groceries above that you really need. This way you can also tick off your groceries while you are shopping.
Basic ingredients
In the last category of your shopping list you will find the so-called “basic ingredients”. These are foods that have a very long shelf life, of which you usually only need a small amount and thus don’t need to be bought every time. These are ingredients such as salt, pepper, honey and oil. You can either tick these off or simply hide them completely using the small arrow on the right.
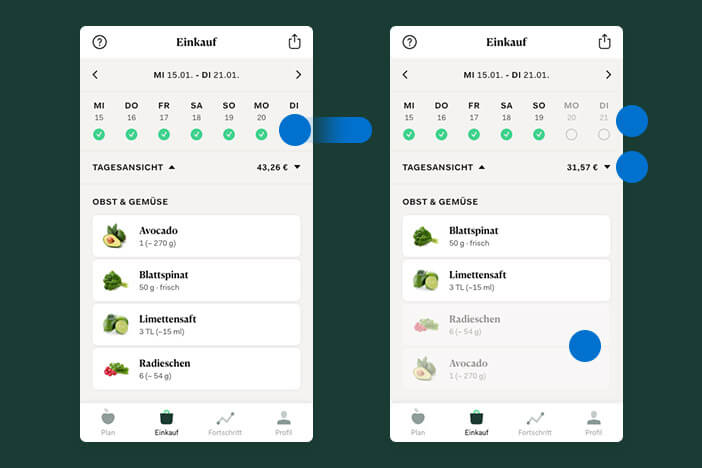
Shop by the day vs for the whole week
When it comes to shopping, everyone is unique and has their preferences. Some prefer to shop once a week, some prefer to shop by the day. That’s not a problem either: you’ll find your weekly overview at the top above your shopping list. At the beginning all days are selected. If you only want to shop for certain days, you can simply deactivate the rest with a click. The shopping list is updated automatically and only shows you the groceries that you need for the selected days.
Your progress
The third button in the bottom control panel is your progress. There you can regularly enter your current weight and document your success. It begins with the starting weight and you can enter your current weight whenever you want to. You do this by setting your current weight using the + and – buttons and then clicking on “Add today’s weight”. This will be included in the overview with the date and so you can keep an eye on your successes. In addition, your calorie goal for the following weeks will be recalculated and adjusted based on your weight entries.
For more detailed information, have a look at our support article here.
Your Profile
The last button is your profile. There you will find all sorts of information about your order and your planning data:
Freeze plan
Again, you have the option to set or manage your break. If you have already frozen your plan, the period of the current break is displayed here and you can edit it. If you haven’t set a break yet, you can do so.
Personal information
Here you will find an overview of all your information from the questionnaire. By clicking on an entry, you can also adjust or change it immediately.
Note: if you update your weight under “Progress” it will be displayed here.
Training schedule
Depending on which plan and program you have chosen, you will find your corresponding workout plans here. With one click you can display it as a PDF.
Ebooks
If there is an additional guide or Ebook for the program (e.g. the motivation guide) you will find it here and can access it as a PDF with a click.
Order
If you have any questions for our service team, you will find important information about your order here, such as your order number, the order date, the start date and information about your payment.
If you have any further questions, we are happy to help you. You can reach us Monday to Friday between 9:00 a.m. and 6:00 p.m. by email, live chat or telephone. Didn’t find the function you wanted? Then we look forward to hearing about how Upfit can be even better. Just drop us an email with your suggestion at info@upfit.io. Otherwise, we wish you lots of fun with the new app!